Home microneedling before and after results are becoming a hot topic in the skincare world. People are looking for effective ways to improve their skin without breaking the bank or stepping into a clinic. With DIY microneedling kits on the rise, you can now achieve professional-grade results right at home. But is it really worth it? Let’s dive deep and find out.
You’ve probably seen those jaw-dropping before-and-after pics on social media where someone looks like they just had a facelift, but all they did was use a microneedling device at home. Sounds too good to be true, right? Well, there’s some science behind it, and we’re about to break it down for you.
This guide will help you understand what home microneedling is, how it works, and most importantly, whether the results live up to the hype. Whether you’re a skincare enthusiast or just curious about this trend, stick around because we’ve got everything you need to know.
Read also:Where Is Prettifun From Discovering The Origins And Journey Of A Rising Star
Table of Contents
- What is Microneedling?
- Benefits of Microneedling
- Home Microneedling Process
- Before and After Results
- Risks and Precautions
- Best Microneedling Devices for Home Use
- Tips for Successful Home Microneedling
- Common Mistakes to Avoid
- How to Maintain Your Results
- Final Thoughts
What is Microneedling?
Microneedling, also known as collagen induction therapy, is a skincare treatment that involves using tiny needles to create controlled micro-injuries on the skin. The idea is simple: when your skin gets injured, it naturally tries to heal itself. During this healing process, it produces more collagen and elastin, which are the building blocks of youthful, glowing skin.
How Does It Work?
When you perform home microneedling, you’re essentially mimicking what happens during a professional session, but on a smaller scale. The device punctures the top layer of your skin, triggering the body’s natural repair mechanism. Over time, this leads to firmer, smoother, and brighter skin.
Now, let’s be real—microneedling isn’t just about sticking needles into your face. It’s a science-backed process that requires patience, care, and the right tools. But hey, if done correctly, the results can blow your mind.
Benefits of Microneedling
So, why are so many people jumping on the microneedling train? Here are some of the top benefits you can expect from incorporating this treatment into your skincare routine:
- Reduces Fine Lines and Wrinkles: By boosting collagen production, microneedling helps smooth out those pesky lines and wrinkles.
- Improves Texture: Say goodbye to uneven skin texture. Microneedling promotes cell regeneration, leaving your skin feeling soft and supple.
- Fades Scars and Hyperpigmentation: Whether it’s acne scars or sunspots, microneedling can help lighten them over time.
- Enhances Product Absorption: After microneedling, your skin becomes more receptive to serums and creams, maximizing their effectiveness.
These benefits don’t happen overnight, but with consistency and proper technique, you’ll start noticing a difference in no time.
Read also:When Is Ysl Woody Birthday A Deep Dive Into The Life And Legacy Of Ysl Woody
Home Microneedling Process
Performing microneedling at home might sound intimidating, but with the right guidance, it’s totally doable. Here’s a step-by-step guide to help you get started:
- Clean Your Skin: Start by washing your face with a gentle cleanser to remove any dirt or makeup.
- Apply Numbing Cream (Optional): If you’re worried about discomfort, you can use a topical numbing cream. Just make sure it’s safe for facial use.
- Sanitize Your Device: Clean your microneedling tool with rubbing alcohol to prevent infections.
- Begin Microneedling: Glide the device over your skin in a back-and-forth motion, making sure to cover all areas evenly.
- Moisturize: Once you’re done, apply a soothing serum or moisturizer to calm your skin.
Remember, safety first! Always follow the instructions that come with your device and never rush the process.
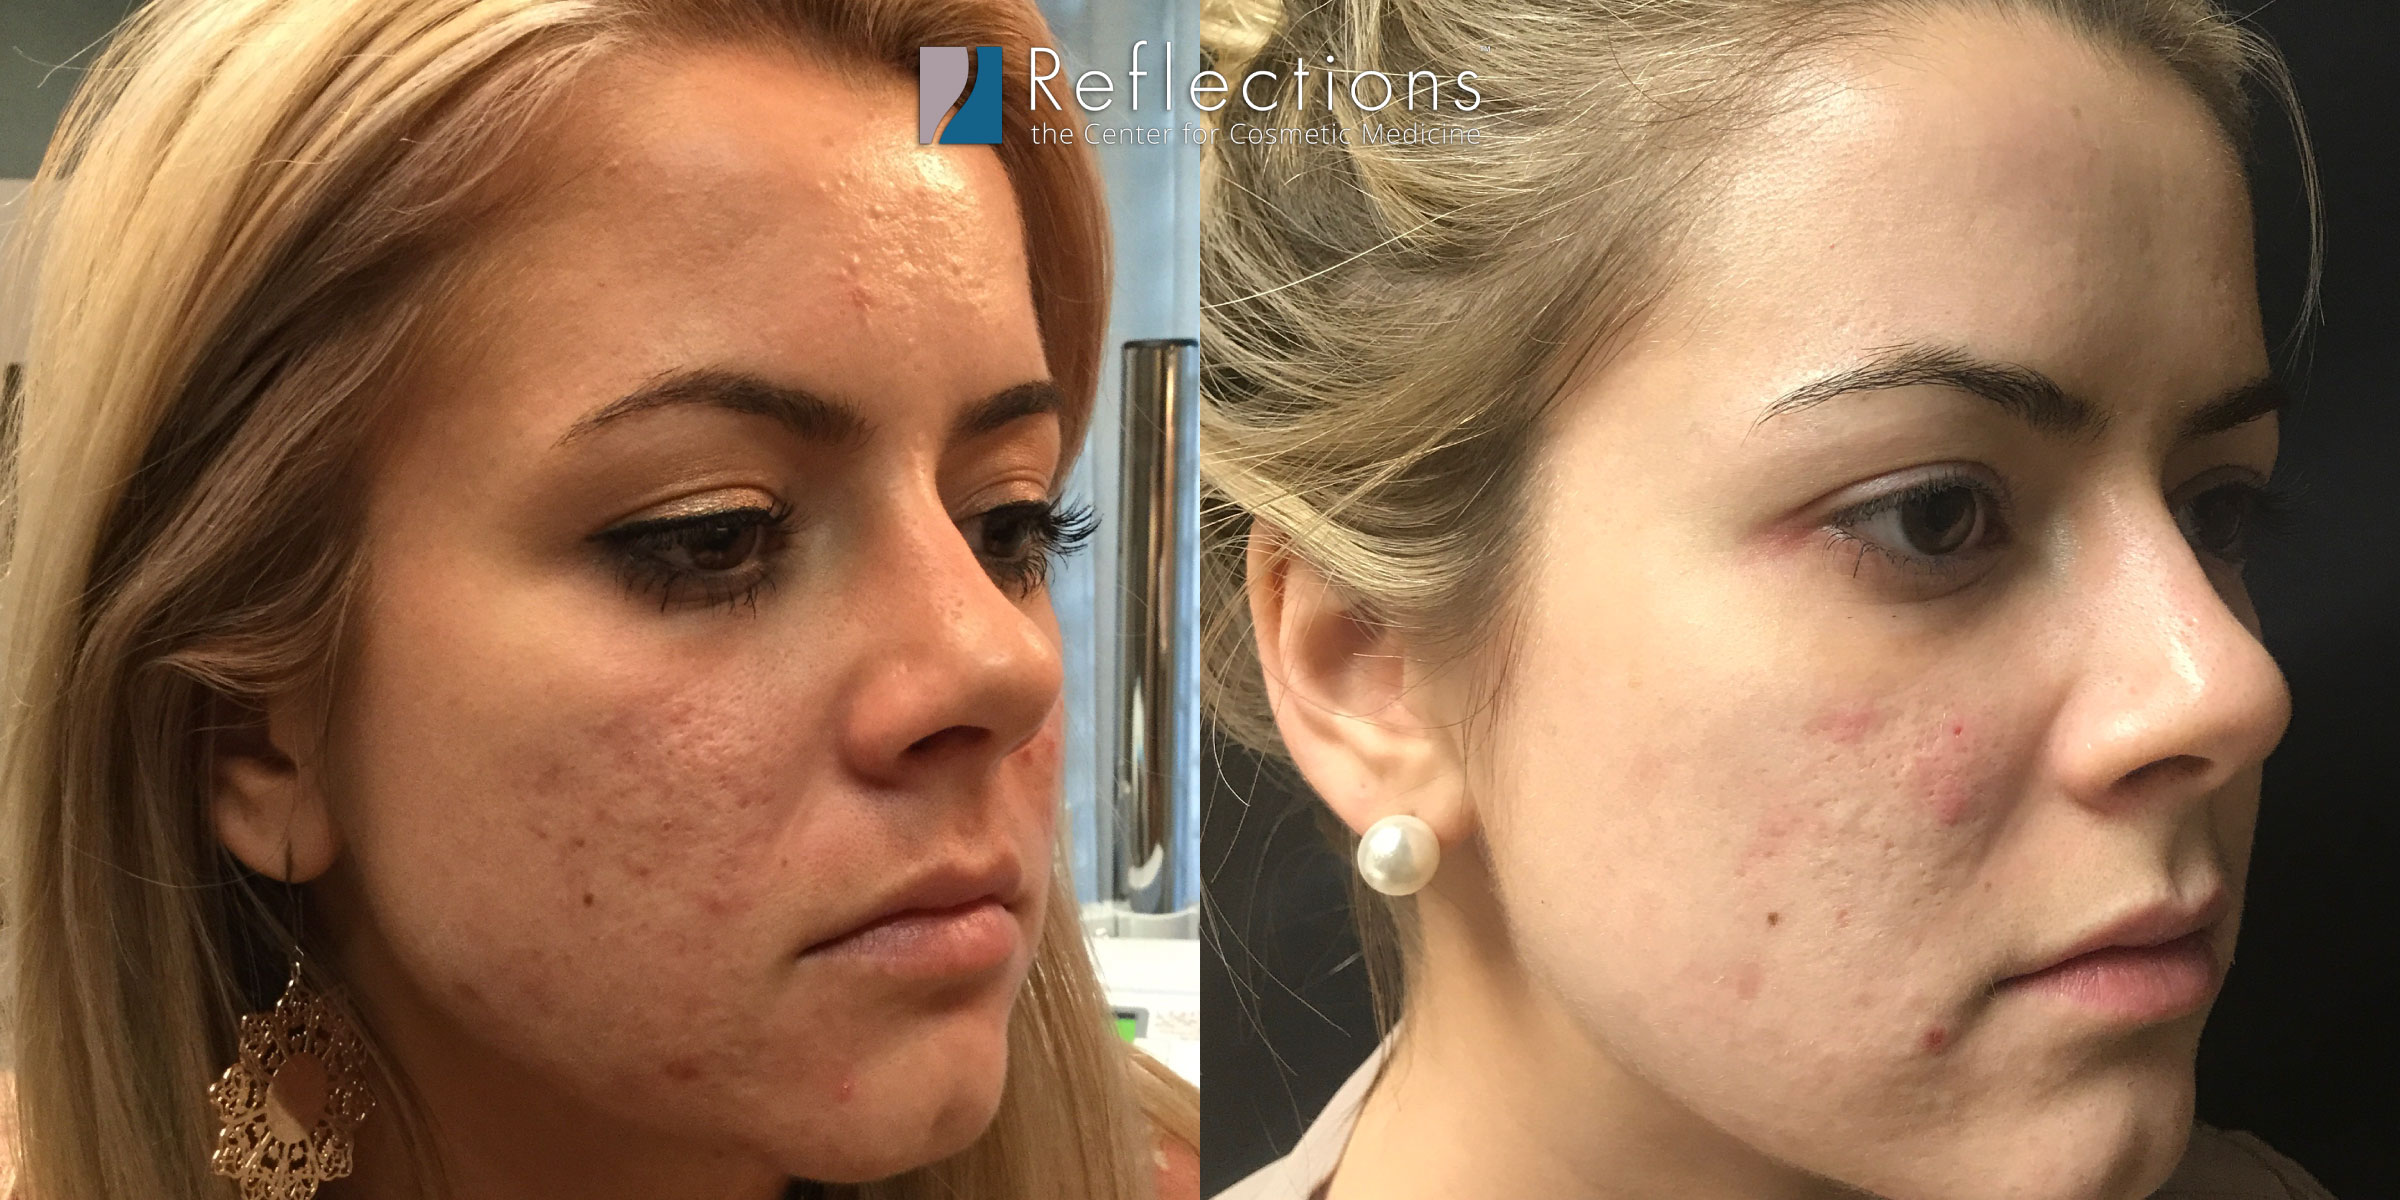
Before and After Results
Let’s talk about the elephant in the room: the results. Home microneedling before and after photos often show dramatic improvements in skin quality. But what exactly can you expect?
Short-Term Effects:
Immediately after microneedling, your skin might appear red and slightly swollen, similar to a mild sunburn. This is completely normal and usually subsides within a day or two. As your skin heals, you might notice a glowy, refreshed look.
Long-Term Effects:
Over several weeks or months, you’ll likely see improvements in fine lines, scars, and overall texture. Some users even report firmer, more radiant skin after consistent use. Just keep in mind that results vary depending on factors like your skin type and the depth of the needles.
Risks and Precautions
While home microneedling is generally safe, there are a few things to watch out for:
- Infection: Using a dirty device can lead to infections, so always sanitize it before and after use.
- Overuse: Microneedling too frequently can irritate your skin. Stick to the recommended schedule, usually once or twice a month.
- Allergic Reactions: Be cautious with numbing creams and serums. Do a patch test first to ensure you’re not allergic.
If you have sensitive skin or certain medical conditions, it’s best to consult a dermatologist before trying microneedling at home.
Best Microneedling Devices for Home Use
Not all microneedling devices are created equal. Here are some top picks for home use:
- SkinPen: A popular choice among skincare enthusiasts, SkinPen offers adjustable needle depths for customized treatments.
- DermaRoller: This affordable option is great for beginners who want to dip their toes into microneedling.
- Mesopress: With its sleek design and multiple needle options, Mesopress is a favorite among professionals and home users alike.
When choosing a device, consider factors like needle length, ease of use, and customer reviews. Investing in a quality tool will pay off in the long run.
Tips for Successful Home Microneedling
Want to make the most out of your microneedling sessions? Here are some pro tips:
- Start Slow: If you’re new to microneedling, begin with shorter sessions and lower needle depths.
- Stay Hydrated: Drinking plenty of water helps your skin heal faster and look healthier.
- Avoid Sun Exposure: After microneedling, your skin is more sensitive to UV rays, so wear sunscreen and stay in the shade.
By following these tips, you’ll be well on your way to achieving those glowing before-and-after results.
Common Mistakes to Avoid
Even the best-laid plans can go awry if you’re not careful. Here are some common mistakes to steer clear of:
- Using Dirty Tools: Never skip the sanitization step—it’s crucial for preventing infections.
- Needling Too Deep: Going too deep can damage your skin instead of improving it.
- Skipping Aftercare: Proper aftercare is essential for minimizing irritation and maximizing results.
Learning from these mistakes can save you a lot of trouble and ensure a smoother experience.
How to Maintain Your Results
Once you’ve achieved your desired results, it’s important to maintain them. Here’s how:
Consistent Skincare Routine:
Stick to a regular skincare routine that includes cleansing, moisturizing, and using sunscreen daily. This will help preserve the improvements you’ve made.
Periodic Treatments:
Don’t stop microneedling altogether. Space out your sessions every few months to keep your skin in tip-top shape.
With a little effort and dedication, you can enjoy long-lasting benefits from your home microneedling journey.
Final Thoughts
Home microneedling before and after results can be life-changing, but only if you approach it with the right mindset and techniques. By understanding the process, using quality tools, and taking necessary precautions, you can transform your skin without ever leaving your house.
So, what are you waiting for? Grab your microneedling device and start your journey to flawless skin today. And don’t forget to share your experience in the comments below—we’d love to hear from you!